#Enviroment
#Download and build#
[Official document] (https://source.android.com/source/requirements.html)
###Download### [Installing Repo] (https://source.android.com/source/downloading.html#installing-repo)
1.Make sure you have a bin/ directory in your home directory
$ mkdir ~/bin
$ PATH=~/bin:$PATH
2.Download the Repo tool and ensure that it is executable:
$ curl https://storage.googleapis.com/git-repo-downloads/repo > ~/bin/repo
$ chmod a+x ~/bin/repo You may need to see the hiden folder .repo, use this command

$ ls -ld .?*
3.Create a folder to hold the file to be downloaded
$ mkdir WORKING_DIRECTORY
$ cd WORKING_DIRECTORY 4.In WORKING_DIRECTORY, initialize repo with the branch that you want to checked out

$ repo init -u https://android.googlesource.com/platform/manifest -b android-7.1.1_r14 -b is used to specify the name of the branch, in the line above, I specified the branch which code support Nexus 5X. The full list of branches can be found [here](https://source.android.com/source/build-numbers.html#source-code-tags-and-builds)
5.Downloading the Android Source Tree
$ repo sync -j8 -j is used to specify the number of threads used during the download.
###Build### To build the lastest aosp code under Ubuntu 16.04, we need openjdk 8:
$ sudo apt-get install openjdk-8-jdk Install other packages


$ sudo apt-get install git-core gnupg flex bison gperf build-essential   zip curl zlib1g-dev gcc-multilib g++-multilib libc6-dev-i386   lib32ncurses5-dev x11proto-core-dev libx11-dev lib32z-dev ccache   libgl1-mesa-dev libxml2-utils xsltproc unzip Configuring USB Access

$ wget -S -O - http://source.android.com/source/51-android.rules | sed "s/<username>/$USER/" | sudo tee >/dev/null /etc/udev/rules.d/51-android.rules; sudo udevadm control --reload-rules Set up environment

$ source build/envsetup.sh
Choose a target
$ lunch aosp_arm64-eng
The target name is formated as BUILD-BUILDTYPE, in the example above, BUILD is aosp-arm64, BUILDTYPE is eng. BUILD specify the environment in which runs the builded image.
Build with 8 threads
$ make -j8 The number of threads depends on the CPU core number, my laptop has 2 core, and 2 threads per core, so -j8 is good for me.
I waited 2h30 to get the build success message:
### make completed successfully (02:36:45(hh:mm:ss)) ###
Then we can run emulator to be sur that the build is done.
$ emulator
To run emulator later we need type:
$ source build/envsetup.sh
$ lunch // choose the one you did before make
$ emulator
The tool idengen provided in AOSP is used to create the android studio / Intellij project file of aosp
$ soruce build/envsetup.sh
$ mmm development/tools/idegen/
$ sudo ./development/tools/idegen/idegen.sh
After the 3 commands, we get 3 files:
Android Studio -> File -> Open -> android.ipr To make the sur that Android Studio look only in the code of AOSP, we should set the JDK and SDK.
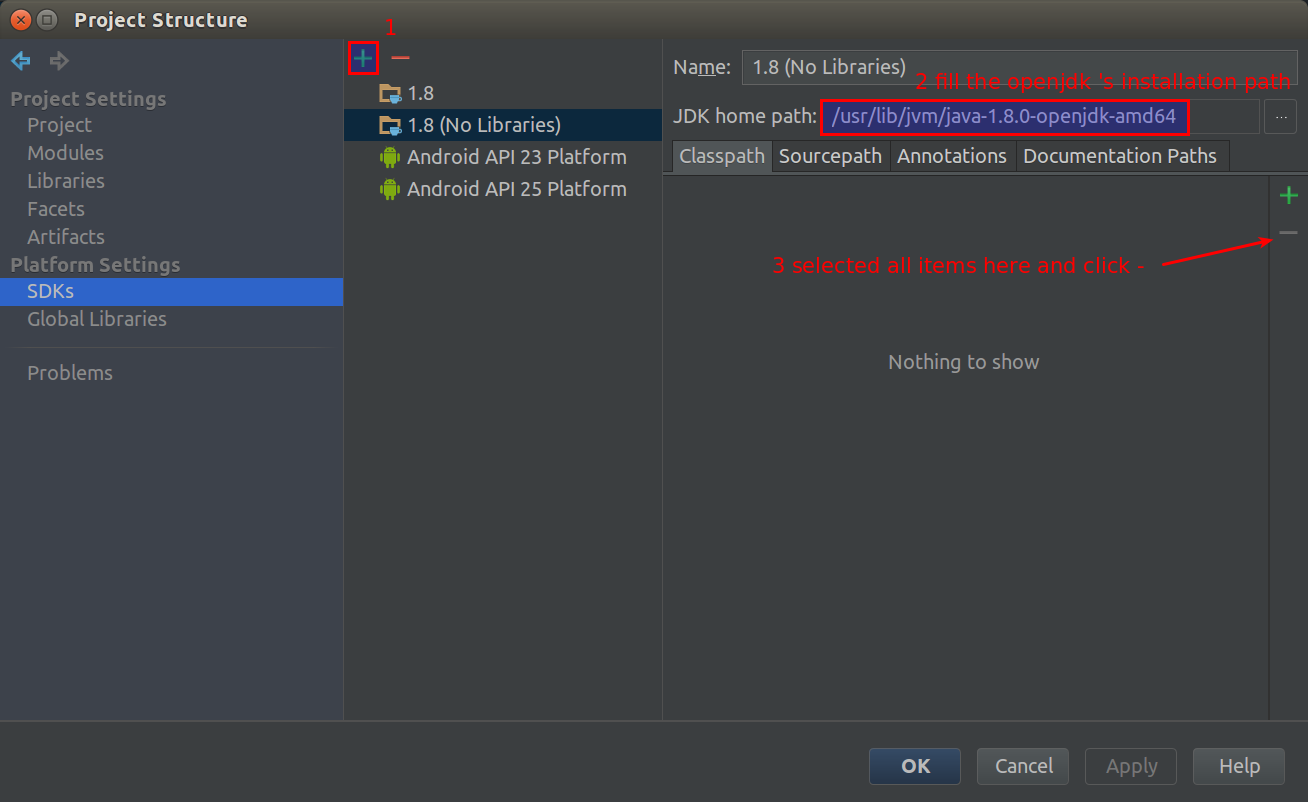
Add JDK 1.8(No Library) : Android Studio -> File -> Project Structure Add a SDK named 1.8(No Library) with all the items under Classpath deleted, and its JDK home path points to the one of openjdk 8 installation. The openjdk 8’s JDK home path can be find by
$ whereis java
we get
java: /usr/bin/java /usr/share/java /usr/share/man/man1/java.1.gz type

$ ls -l /usr/bin/java we get

lrwxrwxrwx 1 root root 22 janv. 20 00:24 /usr/bin/java -> /etc/alternatives/java Now we know that /usr/bin/java is a symbolic link to /etc/alternatives/java
We type
$ ls -l /etc/alternatives/java we get

-rwxr-xr-x 1 root root 6464 janv. 23 18:05 /usr/lib/jvm/java-8-openjdk-amd64/jre/bin/java
Now we find the JDK home Path is /usr/lib/jvm/java-8-openjdk-amd64.
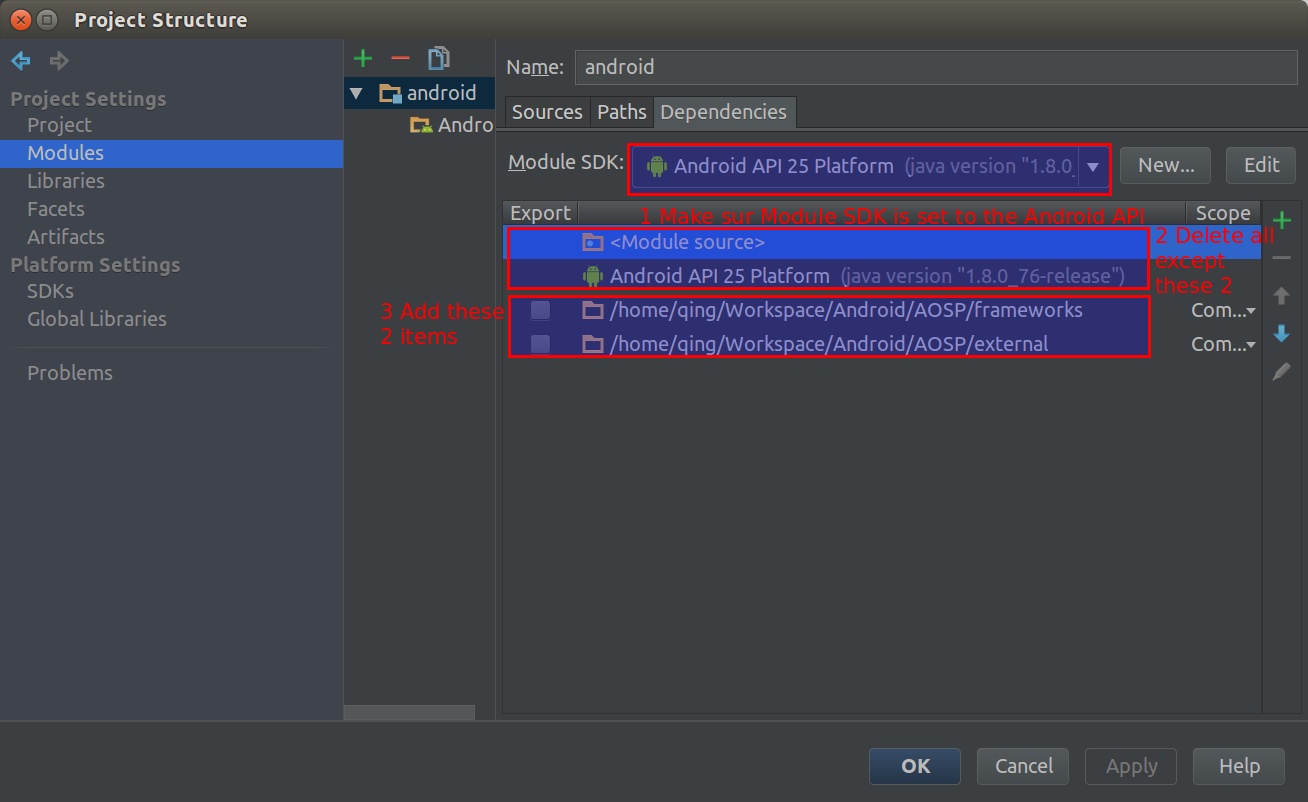
Set the new created SDK as the project SDK

Verify the module SDK is one of the Android API, delete all dependencies except
We’ve done! Now we can launch emulator from android Studio, and add a break point in the source, for example in XXX/packages/apps/Settings/src/com/android/settings/SettingsActivity.java -> onCreate, when you launch the System Setting app on the emulator, the execution will stop at the breakpoint.